The Ultimate Crowd-Pleaser: Is Your Snack Game Ready for This Upgrade?
Have you ever found yourself scrambling for a show-stopping appetizer that’s both effortless and unbelievably delicious? Look no further! Today, we’re diving into the vibrant world of the Seven Layer Dip, a culinary masterpiece that promises to elevate any gathering. Preparing this iconic dip at home isn’t just about saving money; it’s about crafting a personalized flavor experience, ensuring the freshest ingredients, and wowing your guests with a dish that screams homemade goodness. Forget store-bought shortcuts; we’re about to unlock the secrets to a truly unforgettable Tex-Mex appetizers sensation that will have everyone asking for your recipe.
Ingredients & Kitchen Tools
Crafting the perfect Seven Layer Dip requires a balance of fresh ingredients and a few simple kitchen essentials. Here’s what you’ll need:
- Refried Beans (1 can, 16 oz): The creamy, savory base. Look for vegetarian options if preferred.
- Sour Cream (16 oz): Adds a tangy, cooling layer. Full-fat or light options work well.
- Taco Seasoning (1 packet, 1 oz): To infuse the sour cream with classic Tex-Mex flavor. Adjust to your spice preference.
- Avocados (2-3 ripe): Essential for fresh guacamole. Choose avocados that yield slightly to gentle pressure.
- Lime Juice (1-2 tablespoons): Prevents avocado browning and adds a bright zest. Freshly squeezed is best.
- Salsa (1 cup, your favorite variety): A vibrant, chunky layer. Mild, medium, or hot – your choice!
- Shredded Cheddar Cheese (2 cups): The classic cheesy topping. Monterey Jack or a Mexican blend also work.
- Black Olives (1/2 cup, sliced): Adds a briny, savory note.
- Green Onions (1/4 cup, chopped): For a fresh, mild onion flavor and garnish.
- Optional Garnishes: Diced tomatoes, jalapeño slices, fresh cilantro.
Kitchen Tools:
- 9×13 inch baking dish or large serving platter: The ideal canvas for your layered creation.
- Mixing bowls (2-3): For preparing individual layers.
- Spatula or spoon: For spreading layers evenly.
- Mashing tool or fork: For the avocado.
- Measuring cups and spoons: For precise ingredient amounts.
Prep Time & Cooking Schedule
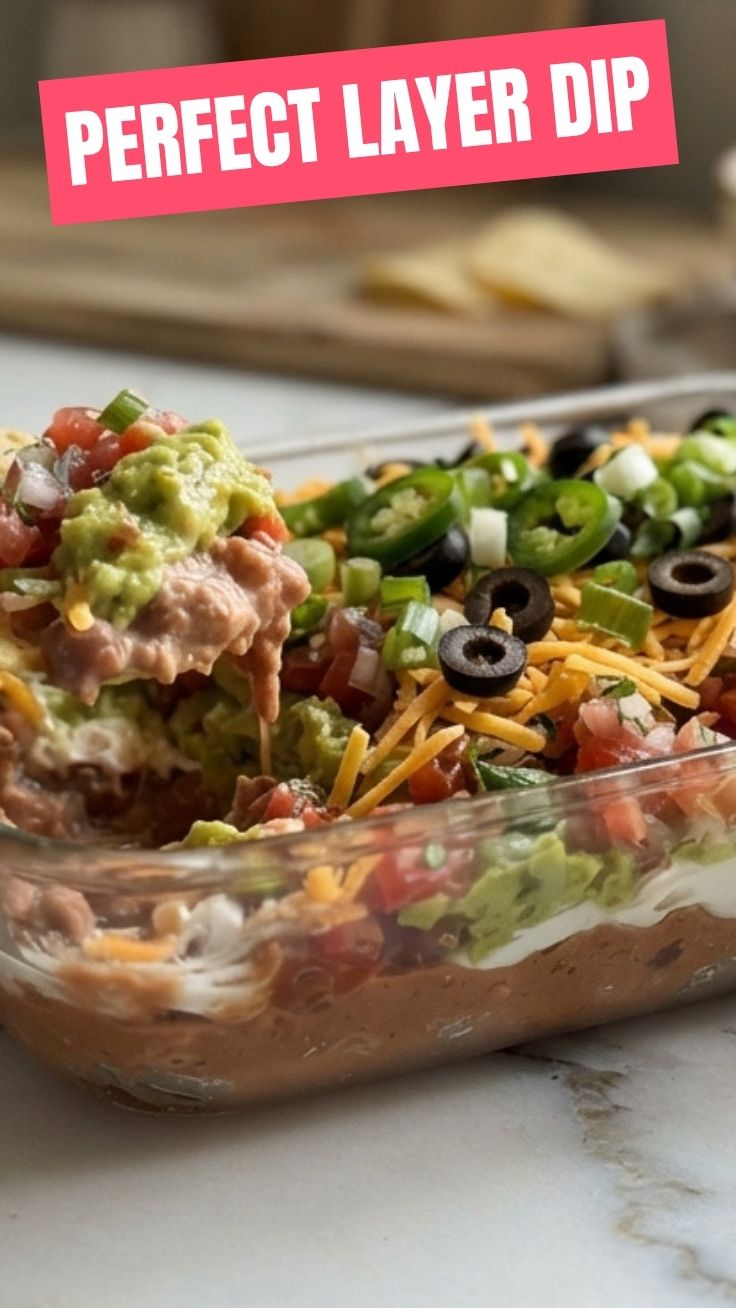
This recipe is all about assembly, meaning there’s no actual “cooking” time involved beyond perhaps warming the refried beans if you prefer.
- Prep Time: 20-30 minutes
- Resting Time: 30 minutes (refrigerated, optional but recommended for flavors to meld)
The beauty of this dip is its speed. You can prepare it just before serving, but allowing it to chill in the refrigerator for at least 30 minutes allows the flavors to meld and the layers to set slightly, making for easier scooping. If you’re planning for a party, you can even prepare most components (like the seasoned sour cream and guacamole) a few hours in advance, keeping the guacamole covered tightly to prevent browning, and then assemble closer to serving time.
Step-by-Step Instructions
Let’s build this masterpiece, layer by delicious layer.
1. Prepare the Bean Layer: Evenly spread the entire can of refried beans as the first layer in your 9×13 inch baking dish or serving platter. You can lightly warm the beans if you like a warm base, but it’s not essential.
2. Season the Sour Cream: In a medium bowl, combine the sour cream with the taco seasoning. Mix well until fully incorporated. Spread this mixture evenly over the refried beans. This seasoned sour cream layer is a crucial component of any great Seven Layer Dip, offering a cool, zesty contrast.
3. Craft the Guacamole: In a separate bowl, mash the ripe avocados with the lime juice. Season with a pinch of salt and pepper to taste. Spread this fresh guacamole gently over the seasoned sour cream. For optimal texture, avoid over-mashing; a few small chunks are desirable.
4. Add the Salsa: Carefully spoon and spread your favorite salsa over the guacamole layer. Ensure an even distribution to get a burst of fresh tomato and spice in every bite.
5. Cheese It Up: Generously sprinkle the shredded cheddar cheese over the salsa. This forms a vibrant, cheesy blanket.
6. Olive and Onion Toppings: Scatter the sliced black olives and chopped green onions over the cheese. These additions provide texture and a savory finish.
7. Final Touches (Optional): If desired, garnish with diced tomatoes, jalapeño slices, or fresh cilantro. This adds another dimension of freshness and color, making your dip a truly irresistible Tex-Mex appetizers centerpiece.
8. Chill and Serve: Cover the dip loosely with plastic wrap and refrigerate for at least 30 minutes before serving. Serve with your favorite tortilla chips, pita bread, or vegetable sticks.
Nutritional Benefits & Advantages
Beyond its incredible taste, the Seven Layer Dip offers some notable nutritional advantages. Avocados are a fantastic source of healthy monounsaturated fats, fiber, and essential vitamins like K, C, E, and B-6. Refried beans provide plant-based protein and dietary fiber, promoting satiety and digestive health. While cheese and sour cream contribute dairy and fats, using lighter versions or incorporating more vegetables can enhance its health profile. It’s a dish that can easily be tailored to be a wholesome, satisfying appetizer packed with fresh ingredients.
Tips, Variations & Cooking Advice
- Spice It Up: Add a pinch of cayenne pepper or a dash of hot sauce to your refried beans or sour cream mixture for an extra kick.
- Bean Alternatives: Black beans or pinto beans (mashed or whole) can be used instead of refried beans for a different texture.
- Cheese Blends: Experiment with Mexican cheese blends, cojita, or a sprinkle of pepper jack for a spicy twist.
- Veggie Boost: Add a layer of finely diced bell peppers, corn, or even shredded lettuce (just before serving to prevent wilting) for more crunch and freshness.
- Dairy-Free Option: Use dairy-free sour cream, cheese, and refried beans to make this recipe vegan-friendly. Ensure your refried beans are lard-free.
- Gluten-Free: The dip itself is naturally gluten-free! Just ensure you serve it with gluten-free tortilla chips or vegetable sticks.
- Portion Control: For individual servings, prepare in small clear plastic cups for a fun, deconstructed approach.
Common Mistakes to Avoid
- Soggy Bottom: Don’t skip the chilling step! Allowing the dip to set helps prevent the layers from running together, especially the bean and sour cream layers.
- Brown Guacamole: Always add lime juice to your mashed avocado and cover it tightly with plastic wrap pressed directly onto the surface if preparing in advance. Oxygen is the enemy of fresh guacamole!
- Over-Salting: Many of the ingredients (taco seasoning, refried beans, cheese) are already salty. Taste as you go and adjust seasonings carefully.
- Too Thin Layers: Ensure each layer is substantial enough to be tasted individually but not so thick that it overpowers the others. Aim for balance.
- Serving Warm: While the beans can be warm, the overall dip is best served chilled. Warm sour cream or guacamole isn’t quite as appealing.
Storage & Meal Prep Tips
Leftover Seven Layer Dip can be stored in an airtight container in the refrigerator for up to 2-3 days. To maintain freshness and prevent guacamole from browning, press a piece of plastic wrap directly onto the surface of the dip before covering. This minimizes air exposure. Freezing is not recommended as it will alter the texture of many of the fresh ingredients, especially the sour cream, avocado, and salsa, making them watery upon thawing. This dip is best enjoyed fresh or within a couple of days of preparation.
Conclusion
There you have it – the ultimate guide to creating a show-stopping Seven Layer Dip that will undoubtedly become a staple in your entertaining repertoire. From its vibrant presentation to its irresistible flavor, this classic is more than just a dip; it’s an experience. We encourage you to try this recipe, experiment with your favorite toppings, and personalize it to your taste. Share your creations with us, and get ready to impress your guests with this incredible Tex-Mex appetizers delight! What’s your secret ingredient for the perfect dip? Let us know in the comments below!
FAQs
Q1: Can I make the guacamole ahead of time?
A1: Yes, you can, but ensure you add plenty of lime juice and press plastic wrap directly onto the surface of the guacamole to prevent browning. Store in the refrigerator for up to 24 hours.
Q2: What are the best chips to serve with Seven Layer Dip?
A2: Sturdy tortilla chips are ideal. Scoops work particularly well for getting a bit of every layer. You can also serve with pita bread, corn chips, or fresh vegetable sticks.
Q3: Can I make this dip spicier?
A3: Absolutely! Add diced jalapeños or serrano peppers to the guacamole or salsa layer, or mix a pinch of red pepper flakes into the sour cream.
Q4: How long can Seven Layer Dip sit out at room temperature?
A4: Due to the dairy components, it’s best not to leave the dip out at room temperature for more than two hours. If serving at a party, consider placing the dish on a tray of ice to keep it cool.
Q5: What if I don’t like olives?
A5: No problem! Simply omit the black olives or substitute them with another topping like corn, diced red onion, or extra cilantro.